With Max For Live devices being created and made available in increasing abundance, it can be easy to feel overwhelmed when browsing for something new to add to your collection. To help you on your quest, we’ve decided to put together a regular blog series to showcase of some devices that have been getting a workout by the Liveschool team. We’ll also be covering some favourites from the Max For Live Essentials package, which is an included download for owners of Max For Live or Ableton Live 9 Suite.
In this post, we are going to look at the world of step-sequenced effects, and how while it’s not an exactly new tool, the humble step sequencer has had a bit of a facelift recently, thanks to the modular nature of the Max For Live environment. Traditionally used as a quick and expressive way to program rhythm tracks and sequence looping synth parts on hardware devices, software based (and notably Max For Live based) step sequencers have opened up the possibilities of this fantastically rhythmic method of programming.
No longer is a step sequencer confined to triggering sounds or outputting note values – the “steps” can now be used to control virtually any effects or parameters, which would be otherwise modulated by automation, velocity, an envelope or an LFO. As you can imagine, this opens up the doors for some pretty interesting sound design.
One Max For Live device which we’ve been using lately and follows this idea of a “step-sequenced effect” is the SRR-BRR Step Sequencer by programmer egnouf. As you might expect from it’s name, the audio effect allows step-sequenced sample and bit reduction. Each “step” controls the amount of reduction, which is a great effect to apply over something like a pad sound or drum loop. Like most step sequencers, the amount and length of steps can be altered, and the sequence can be randomised – check out the screenshot of the devices interface below. This programmer has also put together a handful of other effects in the same vein, such as a filter with step sequence-able cutoff and resonance values – its definitely worth checking out egnouf’s other devices if this type of effect takes your fancy.

Interface of the SRR-BRR sample and bit reduction step sequencer.
On top of using devices built to step sequence one particular effect, we can also emulate this technique using devices which come in the Max For Live Essentials package, which is an included pack with Max For Live and Ableton Live 9 Suite. With a bit of clever routing, we can step sequence virtually any parameter available in our Live set. If you haven’t already downloaded the Max For Live Essentials pack, head here to do so, then you’ll be able to follow the steps below to create your own effect sequencer.
The devices from the Essentials pack we will be using are the Mono Sequencer and the Expression Control. Check out the image below while you’re following the steps to see where all of the controls we will be using live on these devices.

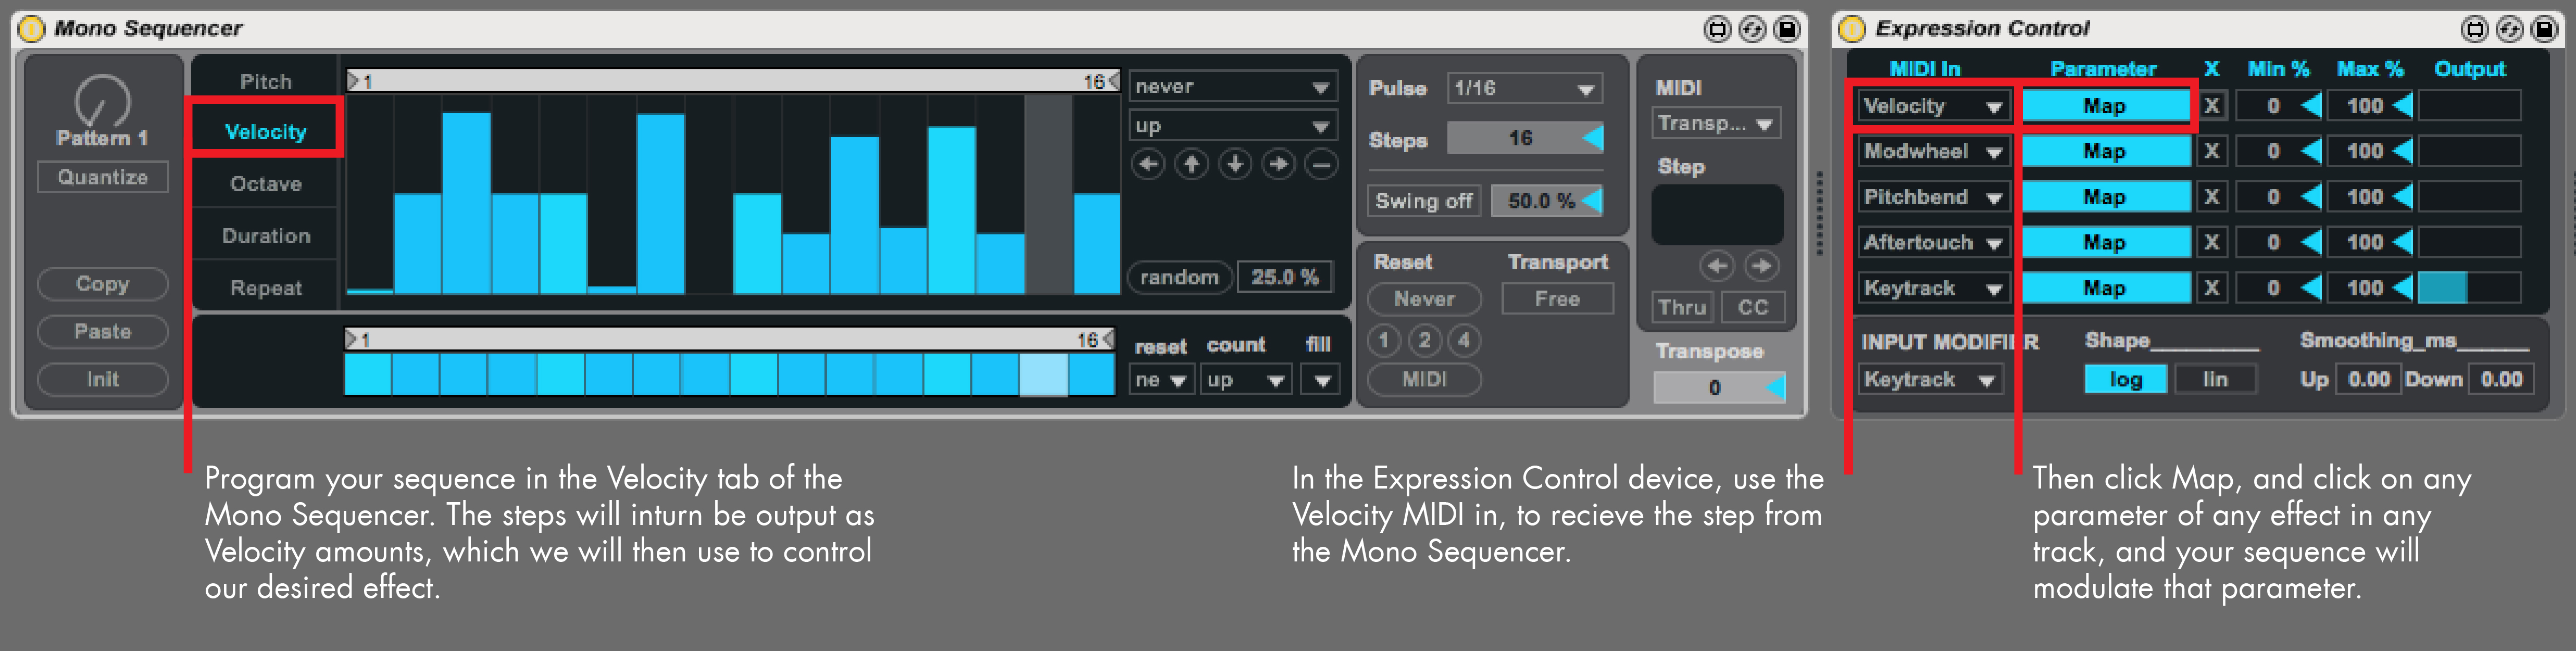
Here are the steps to make your own step sequenced effect using the Mono Sequencer and Expression Control devices included in the Max For Live essentials pack.
First of all, place the Mono Sequencer MIDI Effect on to a new empty MIDI track. This MIDI track is going to be the step sequencer track. In the Mono Sequencer, go to the Velocity tab and then program in a sequence. This sequence will out put as velocity, which will in turn control our desired effect.
Place the Expression Control device after the Mono Sequencer on the same MIDI track. The Expression Control device will take any MIDI expression amount (in this case, Velocity) and turn it into a modulator which can be mapped with a single click to any parameter on any device in any track! So we then simply click Map for our velocity amount and click on our desired parameter.
Viola! You’ve got yourself a step sequenced effect, much like the SRR BRR Step Sequencer shown above, but controlling any device you please. The cutoff of an Auto Filter? The panning of your track? Maybe the rate of the Max For Live LFO device? Again, this is a great example of the possibilities of seemingly simple pre-built Max For Live devices, and how flexible they can be – especially when used in conjunction with another. Be sure to keep your eyes on this Best of Max series for more Max For Live device recommendations, tips and tricks.
Some of our favourite Max for Live devices are explored further in our Focus: Sound Design course, in which students master synthesis and utilise it to establish the sounds that will define their music. Check the Sound Design course page for details on next available intake dates.
For more insight into Max for Live, check out our interview here with well known Max for Live developer and creator of VIZZable, Bob Jarvis.
Subscribe to our newsletter to keep up with our latest free tutorials, samples, video interviews and more to educate & inspire your music production.
Learn more about Sound Design
