Mastering Your Music: Tone Shaping and Multiband Compression
Reading time: 7 minutes
Tone Shaping
Every genre has its sonic characteristics. In hip hop, for example, listeners expect powerful lows and a bright top end. While many producers default to a “smile curve” EQ to achieve this sound, this approach often leaves the crucial midrange lacking.

Steps for Tone Shaping:
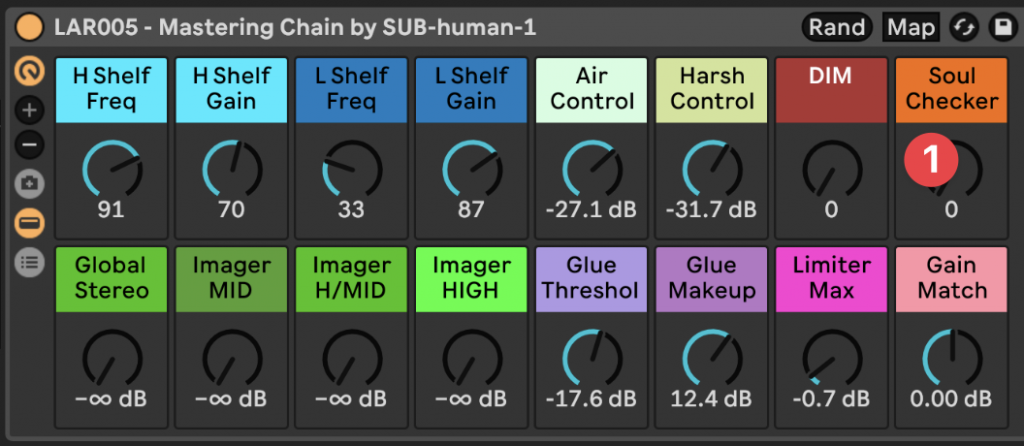
- Engage the Analog-modelled Tone Shaper. Start by boosting the H Shelf Gain Macro
- Move the frequency back and forth until if feels like you are catching too much of the mids (1-5kHz is a good starting point)
- Use the “push and pull” technique: boost until it’s slightly too much, then dial back to find the sweet spot
- Boost the low frequency with the L Shelf Gain Macro, applying the same process
Pro Tip: Bus tone shaping offers a different result to applying EQ changes to individual tracks in the mix. The effect is greater so a little goes a long way on the master bus.
Multiband Compression (Targeting Harshness)
High-frequency harshness can quickly fatigue listeners, and traditional EQ alone can create more problems than it solves. While EQ affects an entire frequency range constantly, multiband compression only acts when needed.

Precision-tuned Bands:
- Air Control: 9.2kHz – 22kHz
- Harsh Control: 2.09kHz – 9.2kHz
Steps for Multiband Compression:
- Start with Air Control:
- Reduce the macro until you see GR (Gain Reduction) triggering
- Aim for movement that resets rhythmically with your track
- If you’re seeing constant reduction, you’re likely over-compressing
- Apply the same process to Harsh Control:
- Listen for improved clarity without losing presence
- Pay special attention to vocal and lead synth clarityVideo Player
Soul Checker: Your Mix’s Reality Check
The Soul Checker isn’t just a mono button – it’s your mix’s truth serum. By collapsing the stereo field, isolating midrange frequencies, and reducing volume, it reveals the emotional core of your track.

Key Functions:
- Phase Correlation Check:
- Minor volume reduction in mono is normal
- Significant drops indicate phase issues
- Quick fix: boost problematic elements’ mid signal using M/S EQ
- Mono Compatibility:
- Critical for club systems and mobile devices
- Even modern stereo devices benefit from solid mono compatibility
Important: Always disable the Soul Checker before final export!
Ready to master these techniques hands-on?
Learn directly from industry experts like SUB-human in a training/mentoring program that covers Mixing and Mastering. Join over 1,000+ producers who’ve mastered their craft with Liveschool.
Produce Music
A comprehensive electronic music production course developed by award-winning artists, producers and Ableton Certified Trainers.
The Focus Series
Combines our four ‘focus’ modules, sequenced in a perfectly-paced schedule to get you making release-ready music by the end of the series.
Mixing and Mastering
Professional-grade mixing and mastering skills from Australia’s top mix engineers and Ableton-certified trainers.
Next intake starting soon – Limited spots available!

