When working with sampled breaks and raw drum loops, you may find they lack the punch and impact required for your track. Often they need a little extra processing to sit well with more modern production elements, or just to fit in with your mix. This is where Drum Buss comes in.
In this tutorial video, Liveschool trainer George Nicholas (Seekae, Cliques) takes us though his own method of using the new Ableton Live 10 device to maximise the impact of your drums, make them gel with your other parts, and make your overall mixes sound more refined and professional.
Below the video you’ll find a wrap-up of the production techniques in question, with some more tips on how to achieve your desired sound.
Ways of enhancing drum loops with Drum Buss
Compression
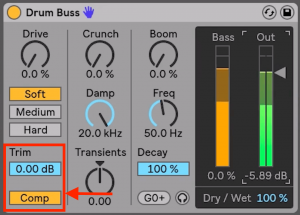
The Drum Buss Compressor section
What is it
A compressor optimised to balance out the sounds in an entire drum group. A deceptively simple interface with a lot going on under the hood.
The Drum Buss compressor is a Fixed Threshold compressor. This means there is no control over the compressor’s threshold, and the amount of compression is determined by the input level.
How to use it
- Turn it on with the ‘Comp’ button on the lower left hand side of Drum Buss.
- It will automatically apply its maximum amount of compression. Dialling back the ‘Trim’ parameter results in a less compressed sound.
- Applying compression will increase the output volume. If you need to balance with the original sample in order to fit it into your mix, you can lower the output volume by turning down the ‘Output Gain’ slider on the right hand side.
What it will do
- Balance out the volumes of individual hits in the entire loop
- Bring up the ambient sound of a drum loop (the spaces between the actual drum hits)
- Watch out, sending the compressor a very high volume input can make things sound messy and smear the attack of your drum hits, so there is not as much crack at the start of each sound.
Crunch and saturation
Use the crunch, drive, and distortion section to add presence and grit to the sound
What is it
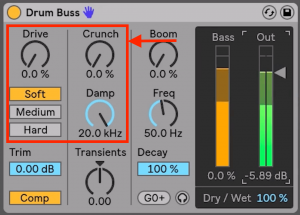
The ‘Crunch’ and ‘Drive’ sections of Drum buss allow you to overdrive your drums with three different types of distortion.

How to use it
Balance each of the available parameters to control the amount of grit and presence you are adding to your loop, keeping in mind that the ‘Damp’ parameter can take the edge off if the saturation is too harsh in the higher frequency range.
What it will do
Each parameter allows you to sculpt the saturation to taste:
Soft: For mild wave shaping style distortion
Medium: For limiting style distortion (like an in-built ‘Limiter’ device)
Hard: For clipping distortion, which will make the sound brighter and fuller in the low end.
Crunch: Sine-shaped distortion. This brings up a lot of the high and mid frequencies. This can provide presence for sounds like claps, snares, and cymbals.
Damp: Low pass filter. Use this to take out some of the top end sizzle of the sound if the other settings are making things sound harsh.
Transient shaping for drum crack and punch
The Transients parameter can give focus and energy to the start or tail of drum hits
What is it
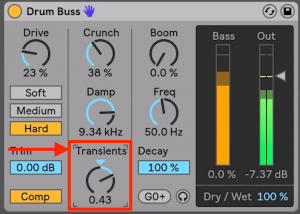
The transient shaper is a type of compressor that is used to emphasise either the attack or decay of a sound.
When to use it
- If you want a crisp drum sound with less room noise, turn the dial left to impart more focus and energy to the start of each drum hit (the transient).
- If you want punchier, more sustained drums, or if the transient sounds too bright and tight, turning it to the right will bring up the body of the drum hits.
Restoring Bass with ‘Boom’
The Boom section of Drum Buss shapes the lower frequencies of your drum sample
What is it
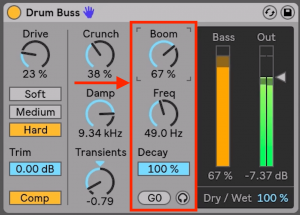
The ‘Boom’ parameter allows you to sculpt the bottom-end of your sample to provide rhythmic and harmonic support to your tune. This is particularly useful for enhancing drum loops and samples that are weaker in the lower frequency range.
Boom is a high pass filter with a highly resonant peak. You can tune this peak to a discrete note using the ‘Freq’ parameter, allowing you to tune any kick drums in your sample to your track, or to add some low end energy in general.
How to use it
Boom: Adjust the percentage to introduce the desired amount of low-end presence
Freq: Use this parameter to tune the low frequency to fit with the sample and the track
Decay: Adjust the percentage for a shorter or longer note
If you wish the sub frequency to be tuned to a discrete note such as the root of your scale, clicking the ‘Force to Note’ button will snap the frequency to the closest MIDI note.
What it will do
- Give your drum loop more energy in the low end.
- When tuned to the tonic (or first note) of your scale, it will strengthen the tonal centre of the track.
What’s next?
Download and try our free drum samples & racks for Ableton Live!