Ableton Live and Native Instruments’ Traktor both offer different performance paradigms for the digital DJ. If you want the best of both worlds, it’s now possible to harness the power of Traktor and Live together in perfect sync, using a single laptop or on multiple machines.
In the video below, Sydney producer Swindail runs you through some of the setups and creative possibilities when using the two together, with the help of Traktor’s new native support of Ableton Link.
Linking Traktor & Live on the Same Computer
The most straight-forward Traktor and Live configuration is using just one computer or laptop. You can mix Traktor and Live together straight away in various configurations:
- Creating a loop with audio or a MIDI instrument in Live, and blending it in with a track on Traktor
- Playing a Traktor track and jamming over the top of it in Live (using a Push or any other controller)
- Running tempo-synced effects in perfect time, like delays or arpeggiators
The Setup
1. Make sure you have the most recent updates of both Live and Traktor (or at the very least, Live 9.6 and Traktor 2.11.0).
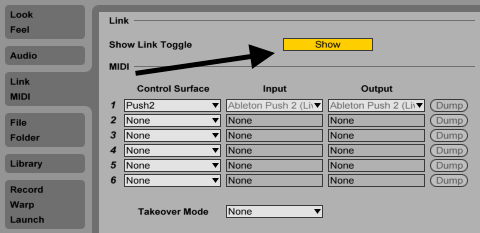
2. Navigate to the Link / MIDI tab in Live’s Preferences and make sure the Show Link Toggle button is enabled.

3. Click the Link box in both Traktor and Live. In Traktor, it’s located in the top bar to the left, and in Live it’s located in the very top left corner.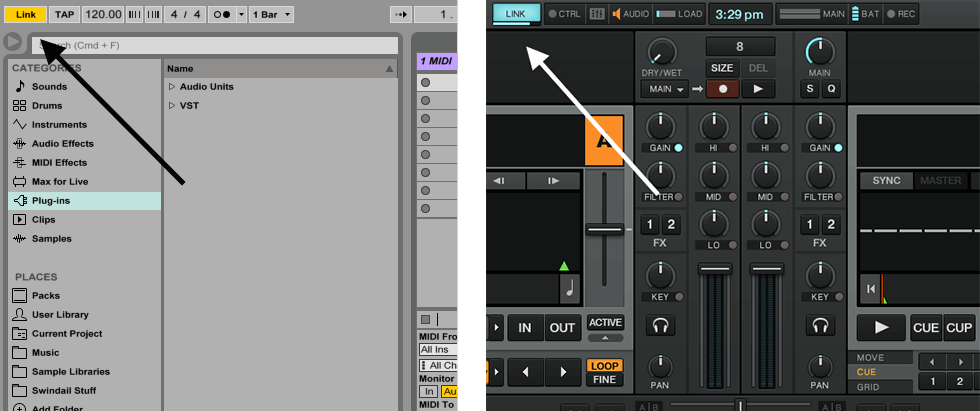
4. Both boxes should now display the words 1 Link. Lastly you’ll need to make sure your Traktor decks are in sync with the Link clock – click the Sync button on your chosen track deck.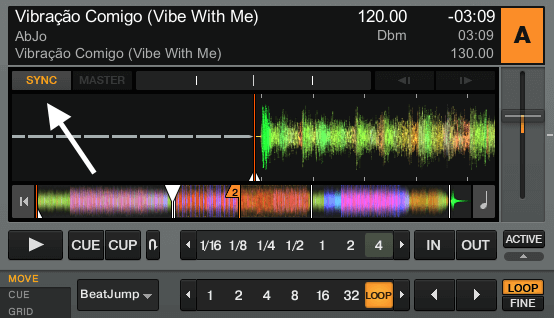
You’re good to go! Hit play on both programs and they will be in perfect sync with each other. You can use the metronome in Live to find the downbeat (beat one of the bar).
Multiple computers
It’s important to note that although you can do this all on one computer, you can actually do this across multiple machines as long as they are connected to the same local network or Wi-Fi connection. For example, have an instance of Live on one computer and use an instance of Traktor on the other one.
Running Live’s audio into Traktor
Now that you know some of the ways you can use Traktor and Live together, we can take this a step further and actually run the audio from Live into Traktor, or run the audio from Traktor into Live. With this setup you can:
- Run Ableton instruments and audio into Live Inputs on Traktor to control channel EQ, key, volume and gain
- Assign Traktor effects to Live audio
The Setup
Note: This setup requires an audio interface, and Jack OS X, which is available here.
1. Download and install Jack OS X, then open the JackPilot application.
2. In the Preferences, make sure your default audio interface is selected for both your Input and Output Device, and your Interface Input and Output channels are set to the maximum value. You can also play around with the Sample Rate and Buffer Size depending on your computer’s specifications.
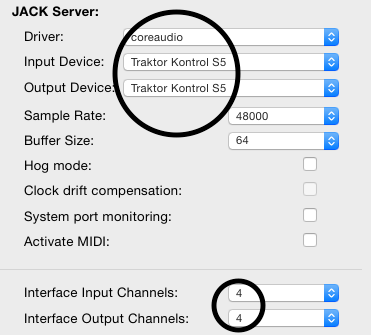
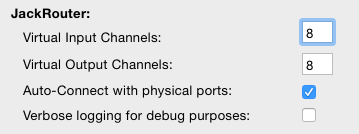
3. Set the number of Virtual Input and Output Channels to whatever you’d like. For this example, I’ll use 8 of each (just two additional stereo pairs of ins and outs). Make sure the “Auto-Connect to physical ports” box is ticked too.
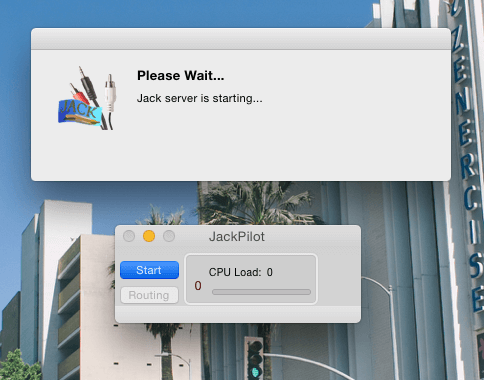
4. Click Save, then hit the Start button and wait for the Jack server to start.
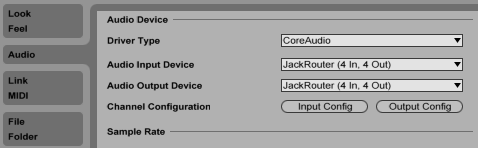
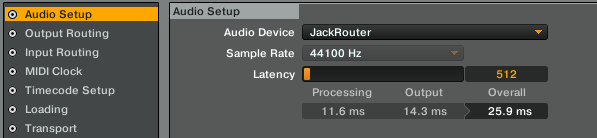
5. Set the Audio Device to “JackRouter” in both Live and Traktor.
6. Go back to JackPilot and open the Routing tab. Here, in the Connections Manager, we’ll connect our additional virtual channel(s) we set up earlier: to make a connection, single click an out from Live’s Send Ports, and double click the corresponding in from Traktor’s Receive Ports. Here, we’ll connect 5 and 6 to complete the stereo pair.
7. We’ll send Live’s master audio to the channel we just connected – select 5/6 from Live’s Master Out dropdown. If it’s not available, make sure 5/6 (stereo) is enabled in Live’s Output Configuration (in the Audio tab from Live’s Preferences).
8. Now we want to receive Live’s master audio on a Live Input in Traktor – we’ll go into Traktor’s Preferences and open the Input Routing tab, where we can assign 5/6 to the channel (here I’ve chosen Input Deck C).
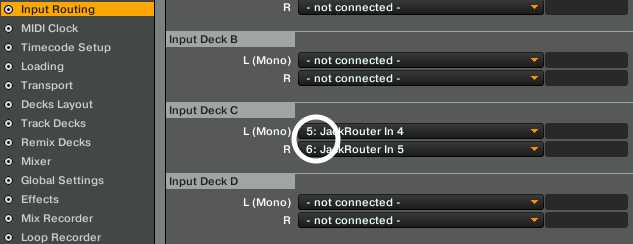
You’re done! Make sure the volume fader is up on Deck C and the gain is set accordingly. Play anything in Live and you should hear the audio coming through in Traktor.
Vice Versa: Running Traktor’s Audio Into Live
So you can send Live’s master audio to Traktor, but what if you wanted to go the other way and send Traktor’s audio to Live? Totally doable, and allows for:
- Running individual Traktor decks into separate audio tracks in Live
- Assigning Live effects to Traktor audio
- Multitrack recording the entire performance into Live
The Setup
Note: This setup requires an interface, and Jack OS X, which is available here.
Steps 1 to 5 are the exact same as the previous setup, please refer to the previous setup. Then:
6. Go to JackPilot and open the Routing tab. Here we’ll connect one stereo pair for both Traktor Deck A and Deck B, single clicking outs from Traktor’s Send Ports and double clicking the corresponding ins from Live’s Receive Ports. Here, we’ll connect the stereo pairs 5/6 and 7/8 (one for each deck).
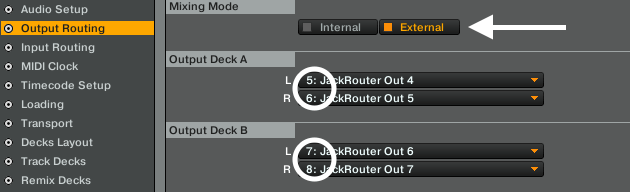
7. Now let’s send the audio from Traktor’s Deck A and B through the channels we just connected. Go into Traktor’s Preferences and open the Output Routing tab. Set the Mixing Mode to External, assign 5/6 to Output Deck A and 7/8 to Output Deck B.
8. Let’s now receive this in dedicated audio tracks within Live – create two new audio tracks and name them Traktor Deck A and Traktor Deck B, then assign 5/6 and 7/8 respectively to the Audio From tabs as shown. If for some reason these aren’t available, make sure the channels are enabled in the Input Configuration in Live’s Preferences.
9. Lastly, make sure the Live audio tracks are record armed and monitoring so that we can hear the audio from the Traktor decks, like so. 
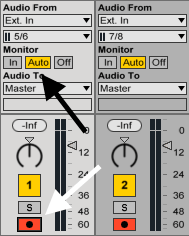
To record arm both tracks, hold down Command (⌘) on Mac or Control on Windows while clicking the record arm buttons.
That’s it! You can now record and manipulate each Traktor deck individually within Live.
More Ableton tips and tricks
Our Liveschool trainers and guests are always sharing new ways to make better music with Live on our blog. Click here to find more tutorials.
If you’re interested in learning more techniques like this to help take your tracks to the next level, check out our Produce Music course.