An age old struggle in working within the realm of electronic music is that our sounds are often sonically too clean, sterile and direct. It’s a problem that’s especially apparent when working within a purely “in the box” set up, using software synthesizers as the primary sound source.
So much of the music I’m drawn towards, electronic or otherwise, employs sounds that are tactile, imperfect, and sit in a space that feels real. Over many years of creating music with a largely software based set up, I’ve slowly collected a bunch of tools and techniques to help achieve these sounds, and to combat the cleanliness and un-invited fidelity. This isn’t just about creating lo-fi sounds or emulating hardware, rather, for me taking synthesized or simple sounds, and give them an extra element of depth, space and physicality.
FILLING THE SPACE
I often find that it’s not always the sounds being used that make a tune feel sterile or flat, it’s the negative space between and around these sounds. A good case for recording to, and from, physical mediums such as tape and vinyl, is that in the analog environment, pure silence is hard to come by. There is almost always an incessant hiss, crackle or hum that is churning away regardless of whatever else is going on.
A great and obvious example of a producer who solves this problem to full effect is Burial. From my understanding his music is made entirely with software, and his rhythms are very sparse, but he uses washes of vinyl crackle and field recordings to smear out and fill the empty space (apparently thanks to the suggestion of his early mentor and label-head Steve Goodman aka Kode9).
Generating texture within Live
An easy way to achieve this same technique is by using Live’s own Vinyl Distortion audio effect, with its built in “Crackle” generator. While the Vinyl Distortion device is a quick solution, I often layer in samples recorded from the run out grooves (the silence at the end) of vinyl records, which tend to be far less static and have other artifacts that add to the personality of the sample. This can easily be recorded if you have a turntable and any record available – the dustier and crustier the better! If not, there’s a bunch of vinyl crackle samples available online, on sites like freesound.org (one of my favourite sites on the web, more on this later). 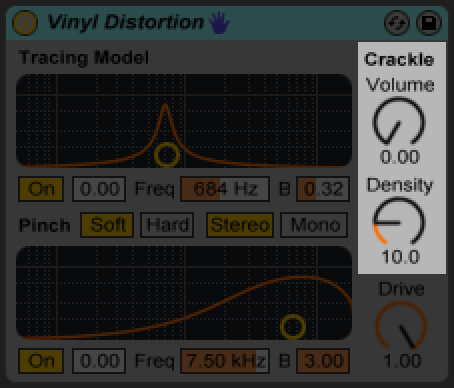
The vinyl crackle technique, especially in the wake of Burial, has become in my opinion a little overused – and can be detrimental if your tune ends up actually getting pressed to vinyl. Another was to achieve the same result, is layering samples other than vinyl crackle – any sustained, relatively inoffensive and atonal sound can work I usually use field recordings of actual spaces, either recorded myself or sourced elsewhere. Again, freesound.org is a great resource for this, and has a wealth of all kinds of field recordings, lovingly tagged and uploaded for royalty free-use. That being said it’s almost just as easy to use your laptop’s internal mic or whip out your iPhone to record whatever space you might be in at the time. I have found that recordings of “silent” rooms or “room-tones” are really effective for this, and a lower quality microphone like those inbuilt in laptops or smartphones already have an inherent noisy quality to them that helps the cause.

LAYERING NOISE / EFFECTING SOUNDS
Once they’re sitting in the space of your track, treating your textured sounds is where it starts to get really fun – and it can help bring the realness to your sound design. The inspiration for these techniques originated out of wanting to emulate the crunchy, almost lo-fi, hardware based sounds of a lot of more left-field techno and house music. Take for example DJ Spider and Marshallito’s demented C17H21NO4. Most probably created with a simple hardware setup, every element is bathed in noise and tape halos, with textures you can almost reach out and grab.
Outside of the obvious saturation and overdrive devices you could use to achieve these effects, using sample layering is a great way to reach a similar aesthetic. This way there’s more flexibility – and you don’t have to obliterate your original sounds.
Again, the process itself is simple – take a sample of something textural and with plenty of character, and layer it on top of your existing drum sound, synth part or other sample. I’ll often do this in Ableton Live using an Instrument Rack with a couple of chains, one housing the original synth or sample and another with a Sampler containing my “texture layer”.
Let’s take a specific application as an example. I love the vinyl sampled drum sounds of a lot of older Hip Hop music. However, if I’m making a tune that needs to work effectively in a modern club setting, a kick drum pulled from a James Brown break usually isn’t going to cut it without a bunch of work in processing and layering. Instead, I’ll take my existing kick drum sound, and layer it with a vinyl crackle sample similar to those I mentioned before. If you adjust the envelope of the layered sample so that it tails along with the kick drum and apply some slight EQ, the kick will start to sound as if it was actually pulled from a record (with a mighty good sample recording set up).
You can see that just like the earlier technique, there’s no limit to the sounds you can use as textural layers. Record any interesting textures you can find with whatever you have available (iPhone, laptop mic, Dictaphone, U47); trawl freesound.org or Youtube; or grab a sample pack like the brilliant Dirt and Layers by Goldbaby, which has a huge selection of crackles, scrapes, amplifier hums and tape halos ready to piled on top of your sounds.
Taking it back to native Live devices, another favourite of mine for these types of results is both the Vocoder and Erosion devices. I often find myself using an Erosion device (or three) on near enough to every track in my sessions, usually using the Noise or Wide Noise modes. Outside of saturation and drive effects, Erosion is another very usable and predictable way to add some presence and grit to a sound. I find it particularly effective on sine wave based sub bass parts.
Vocoder, when using noise as the source, is almost like an extra noise oscillator for any sound, complete with a simple envelope generator. To avoid it sounding too clean and crisp, it’s useful to set up an Audio Effect Rack with the one chain as the Dry signal, and another chain as the Wet signal – housing the Vocoder followed by some processing effects to add a little bit of extra depth.
Using Hardware
Taking all this one step further, a relatively cheap and fun solution is to use an old, beaten up recording device. One of the first pieces of hardware equipment I ever owned
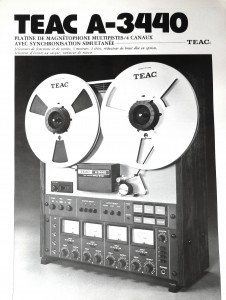 was a Teac 3440 – a classic consumer grade 1/4″ reel to reel tape recorder from the 70s (thanks dad). I use this to record tracks to tape directly from Ableton Live via my audio interface, and then record them back in to add some authentic crunch and tape artefacts. As a time-saver, I’ve even run whole sample packs of drums sounds out the reel to reel recorder for crunchy alternative in future productions. Cheap cassette and reel to reel tape recorders are easy to come by on eBay, and paired with a simple audio interface can be a really effective tool for creating some of the techniques I’ve talked about.
Thomas McAlister is a Liveschool trainer, and produces under Cop Envy, Sean Thomas, and is one half of ALBA.
Learn the skills you need to develop your own sound with our Sound Design & Synthesis course.