One of my biggest music production time savers is setting up custom defaults in Ableton Live – and it’s much easier than you think.
We all like to, and often need to, work as quickly as possible. When the inspiration hits, we need to be able to put things in place without letting the software get in the way of creativity. The ability to customise Live’s various defaults allows you to freely pull in samples, sounds, effects and devices and have them set up the way you like to use them, straight away. I’m going to take you through how to tweak the four best time saving default presets, so you can create your own and customise Ableton Live to your personal workflow.
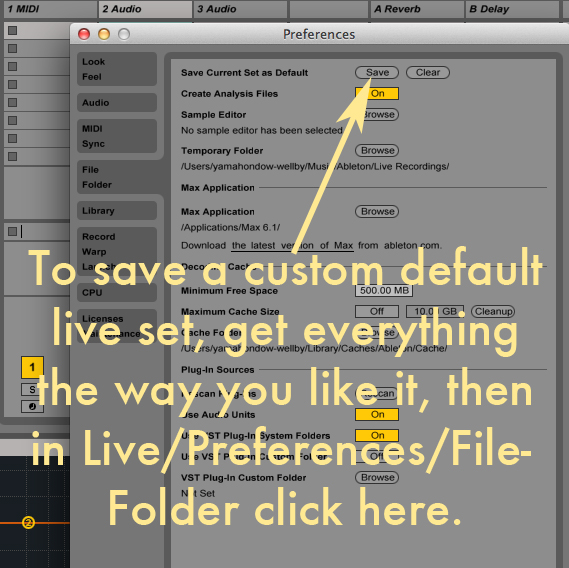
Creating a Default Live Set
Think of all the settings you change and devices you pull in every time you start writing. Rather than setting them up every time, all these recurring settings and devices can be saved as a default template set. This means that every time Live is opened, everything you saved as your default template set will be recalled – your I/O settings, Send and Return tracks, devices…even audio and MIDI Clips can be saved in your default Live set. This can be especially handy if there are particular effects sends you often use – or a tempo you like your set to be at from the get go that isn’t 120bpm. I make basic use of this, as I prefer to start with a relatively blank slate. At the moment, my template set has four Returns channels – long reverb, short reverb, long delay, short delay and one audio track. Live 8 users who made the jump to Live 9 might have noticed that Ableton themselves took advantage of this feature – they changed how the default Live set works for everyone. Live 8 had 1 MIDI and 1 Audio track by default, as well as two Return tracks with no effect devices on them. In Live 9 they changed this to 2 MIDI and 2 Audio tracks (both resized to make the track meters visible) and placed a reverb and delay on the returns for instant tweaking gratification.
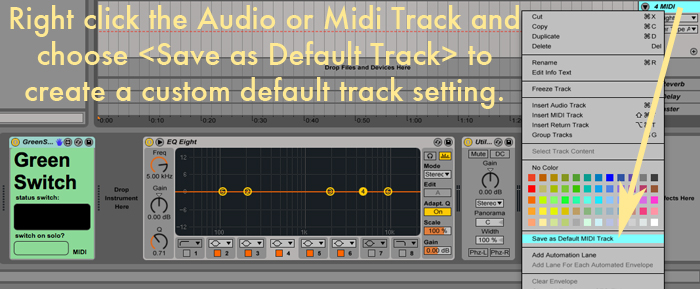
Audio / MIDI Track Defaults
Saving track defaults means that every time you create a new Audio or MIDI Track, it will be created exactly as you like it – you can customise the Devices on the track, the track level and pan, even it’s colour. My default midi and audio tracks have exactly the same devices set up, being the maxforlive green switch, EQ Eight and Utility. I’ll explain why:
- First, the MaxforLive Green Switch device. In short the Green Switch turns off devices not currently in use – saving your CPU. It does this by reacting to a track being muted or solo’d. When a track is muted it will switch off all devices on the muted track, or when a track is solo’d it switches off every device other than those on the solo’d track.
- Filtering is usually the first thing I will do to sculpt a sound, and being a visual person (with far from perfect ears) I like to be able to see what’s going on in the frequency content of a sound, so in both my default Audio and MIDI tracks I have an EQ Eight device, with the EQ Eight’s visualizer and six of the eight EQ/filter points turned on (but set flat). I also set point one and eight to be 12db/8ve cuts rather than the default shelf setting.
- Next I have the Utility device (again, set flat). I prefer doing a lot of my volume and mute automation with the Gain control of the Utility device – leaving my track volume for adjusting the volume of the entire track. Aside from visualising, basic filtering and volume control, there’s not a lot else that I’m always going to do to an Audio or MIDI track, so that’s as far as I take my Track defaults.
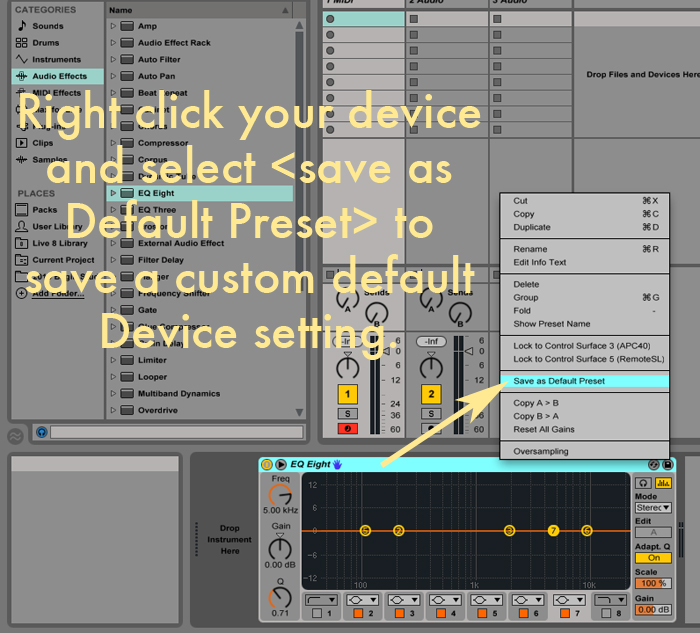
Device Default Presets
You can edit and save your own defaults for all of Live’s Devices. If I’m pulling in an Audio Effect, I like to pull in the default Device, rather than a preset, and adjust the settings “from scratch”. With some of the Audio Effect Devices though, I find the default setting have either too much going on (See Filter Delay), or are just not to my taste. Like my Track defaults, I have my default EQ Eight set with six filter points on and points 1 and 8 set to a 12dB/8ve cut. My default Filter Delay is much tamer than Ableton’s initial default, with the delay volumes and dry volume all set to 0db, the left and right delays panned almost to the centre, and the delay type set to Repitch.
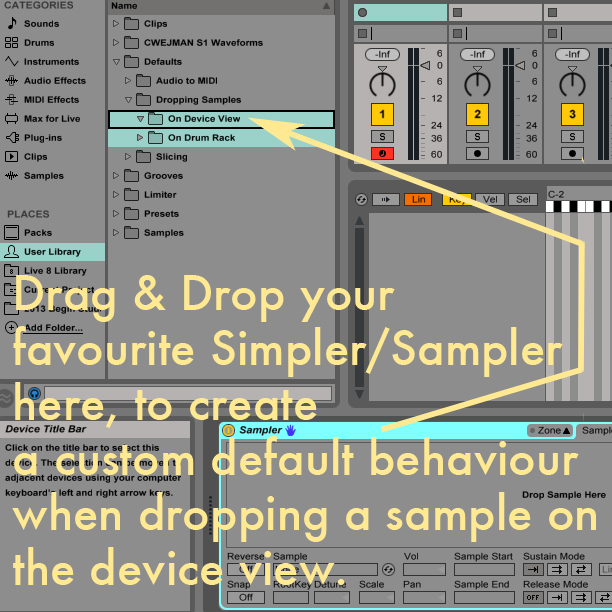
Sample dropping Defaults
As simple as it seems, for me this is the mother load of all defaults. If you didn’t already know, Live allows you to drop a sample directly into the device view at the bottom of an empty midi track and it will automatically put this into a Simpler device for you. You can change the default state of this Simpler – for example, do you prefer the volumes to be quieter or louder than the existing default? do you want the instrument to be more / less velocity-sensitive? or not respond to velocity at all? If you have Ableton Live Suite or have bought Sampler, you can even tell Ableton to use a Sampler instead of Simpler as a default for this process (and yes, I prefer Sampler). You can also have the Sampler or Simpler device load with customised default settings. For example, I have the loop mode of my sample set to trigger (if you don’t have suite, you could achieve the same by having the Release of your volume envelope set to 5 seconds or more), Velocity control of the sample’s volume set to 0%, and the sample volume set to -6dB. If you are a Drum Rack user, you can set up the same default Simpler/Sampler behaviour for dropping samples into the Drum Rack, just drop it into the ‘On Drum Rack’ folder pictured below.

Make it Yours
Personalising certain processes within Ableton Live can do wonders for your workflow – which should be hindered as little as possible by software. If you were producing using a studio full of hardware – you’d have your favourite gear patched in, easily accessible and ready to go with your most used settings. If you were a guitarist, you’d choose change the action of your strings to best suit your playing style. Software shouldn’t be any different – make your life easier by customising Ableton Live to suit you.
Subscribe to our newsletter to keep up with our latest free tutorials, samples, video interviews and more. Learn more about Producing Music with Ableton Live.