In Ableton Live there are many ways to re-shape a drum loop – many users are already familiar with editing clips and using the Beat Repeat audio effect – but here we take a look at other ways to manipulate drum loops for musical effect. This tutorial video, by Ableton Certified Trainer, Adam Maggs, covers lots of ground and includes some solid tips for extracting drums using Live 9’s new “Convert Drums to MIDI” feature and some creative ways to turn drums into music.
Here are some deeper details on the tools and techniques covered in this video:
UTILITY
The Utility device is one of a handful of audio effects in Ableton Live that doesn’t change the sound when you first apply it to a track – the sound passes through the device unchanged until you start changing it’s parameters. One useful parameter for working with drum loops is the Channel Mode – which, on the default preset, you can see the word Stereo. In this default state, the full stereo signal is heard, but you can change this to Swap which speakers the left and right signals play through, or to only let the sound from the Left or Right channels play through to both speakers.
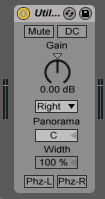
Utility device
It’s these last two options that can be particularly useful for working with drum loops, because different pieces of a drum kit are often panned to the left and right – it’s common for hi hats, toms and cymbals to be panned – which gives them more volume in one speaker than the other. So if you want to enhance or reduce the volume of some parts of the drum kit (say, make the toms louder or reduce the volume of the cymbals) then you can sometimes use the Left or Right settings on Utility to make this happen.
It’s worth noting that using either of these two modes you will lose the stereo width of the sound, so if the stereo panning feels like an important feature of your loop then you might want to consider using EQ’s to enhance or decrease the volume of individual parts of the kit.
Video cue: See this technique using Utility to highlight the hi hats on the right channel

EQ THREE
EQ Three is a simple audio effect device that acts as a tool for adjusting the volumes of 3 frequency bands – the Low frequencies (bass drums, low toms), the Mid band (snares, claps, finger snaps) and High frequencies (hi hats, cymbals, shakers, tambourines, etc). How it works is the sound of the drum loop passes in from the left of the device and gets “split” into those 3 bands, allowing you control over the volumes of each – great for boosting the kick drum volume, reducing the high hats, etc.

EQ Three device has a new Flat Response setting in Live 9
That said, the frequency profile of a kick drum often extends from the lows, through the mids and even up to the highs. Similarly, snare drums often have some low frequencies and high frequency content – not just mids – so it can be difficult or impossible to completely isolate one part of the kit from the others. So what can we do about it? Well, you can adjust the setting of where the “lows” finish and the “mids” begin. This can be adjusted by the FreqLow dial. Likewise, the FreqHi dial adjusts the crossover point between the mid band and highs.
Note: If you’ve been using EQ Three in Live 8 and have recently moved to Live 9, you’ll be pleased to know that this device has received an upgrade to give it a Flat Response option (right click the device to de-activate this option if you prefer how it worked previously). What this means is the two crossover-points (the one between the lows/mids and the one between mids/highs) no longer “colour” the output sound by adding extra volume at those frequencies… to understand what this means, try disabling this feature and adding five (5) EQ Three devices to your loop and you will hear the crossover frequencies being emphasised.
EQ EIGHT
EQ Eight achieves the same results as EQ Three using the same methods of splitting the incoming signal into discrete bands for you to then manipulate – though, as the name suggests – you now have eight bands, plus the ability to adjust left and right signals independently and many more options for finer control over sculpting the sound.
In the tutorial video, the drum loop has hi hats panned to the right and we use the Utility device to only play the Right channel (thus resulting in louder sounding hi hats). As discussed in the Utility section above, this setting makes the signal mono which, depending on what you want to achieve might be undesirable – also, for some drum loops that same technique could result in some sounds (the ones panned to the opposite channel) becoming quieter. To avoid this, use EQ Eight instead of Utility, and switch EQ Eight from Stereo mode to L/R mode. Here you can adjust the volumes of the panned items in their respective channels.
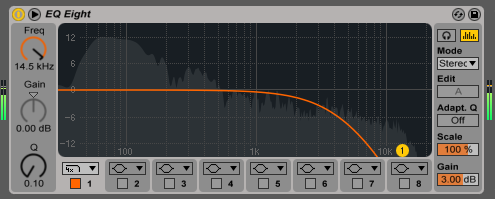
In Ableton Live 9, the EQ Eight device now displays the changes you make to the audio spectrum
WARPING
Warping allows us to manipulate the rhythm of a drum loop, by placing yellow Warp Markers on each hit (double click the top of the waveform display) and then moving them left or right. The quick way to move just one hit at a time doesn’t require double clicking – just hover over a grey Transient Marker (you will see it enlarge, known as a Pseudo Warp Marker) hold Command and drag in the direction you want the drum hit to go. This will create 3 yellow warp markers and move your drum hit, all in one movement.
Video cue: see this move, affectionately known around these parts as the Triple Warp Burger.
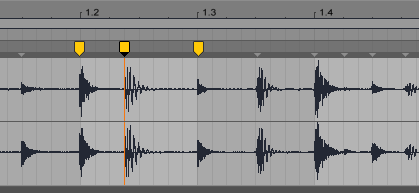
Triple Warp Burger is a tasty little shortcut. (And yes, that cheese is complimentary).
shortening drum hitsWarp Modes
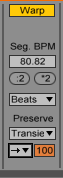
WARP MODES
Another trick for drum loops in Ableton Live is to use the Warp Modes for creative effects. These modes serve the purpose of preserving sound quality when changing the tempo or tuning of audio clips, but they can equally be abused to give intentionally distorted results. You’ll find a drop-down menu to the left of the waveform display that says Beats and you can change this to other modes, and manipulate the Preserve modes beneath, and you can also change the tuning of the drums using the Transpose dial.
MULTIBAND DYNAMICS
Multiband Dynamics is an audio effect device in Ableton Live that can control the volumes of 3 frequency bands in complex ways. Just like the EQ Three device, Multiband Dynamics splits the incoming sound signal into 3 bands (lows, mids and highs) and allows you to turn their volumes up or down. Where it gets awesome (and potentially confusing at first glance) is that on each band you can look at the changing volumes of any given band and locate a volume zone where the hits are loudest and a low-level zone where the sound the quietest volumes are, and once found you can turn the volumes in both of those zones either up or down. To give an example, with the hi hats you could find that there is a loud impact that reaches -12 bB (it’s high volume zone) and some lingering sizzle at the tail end of the sound that is much quieter and hovers around -60 dB (it’s low volume zone). With this example you can use Multiband Dynamics to turn up the volume of the sizzle (without altering the volume of the impact) or you could turn down that section completely and eliminate it (leaving only the sound of the impact). The process of turning up the quiet stuff is called upwards compression because it reduces (compresses) the range of volumes. Turning quiet stuff down expands the distance between loud and quiet and is called downwards expansion. And based on that, if you now think about the loud zone – turning it up or down will either increase or decrease the dynamic range, so we call those actions upwards expansion or downwards compression.
In the video tutorial you can see the low volume zones have all been turned down, thus eliminating all the record crackle and background noise and even shortening the length of each hit a little bit. (To try this yourself, click the B in the T B A panel and turn the ratios down, starting at 1:1.00 and drag it all the way to the bottom, for all 3 bands).
Video cue: see the before / after of this technique, comparing via the Amount dial (headphones recommended)
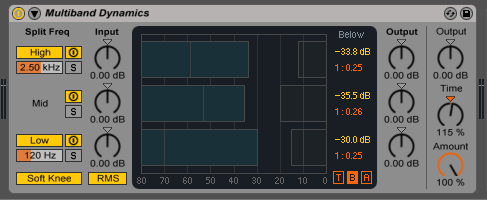
Multiband Dynamics set to reduce background noise
RESONATORS
Resonators are an audio effect device in Ableton Live gives the impression your drum loop is morphing with synth notes or chords.
(Another way to do this is to use Simple Delay, turn the Link button yellow, turn the Sync button to Time, turn the Feedback dial to 100% and then play with the Ms setting. If you do this you will hear the tuning rise or fall. The Resonators device is similar to this except all the frequencies are tuned to exact musical settings.)
Video cue: see the drum loop morphed into a tuned power-chord based on the root-note (A#1), and the Decay manipulated to create a swelling effect.
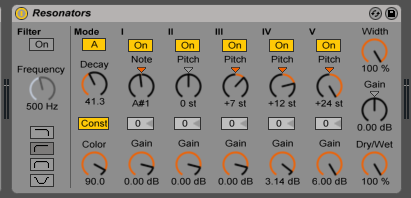
Resonators set to generate a power-chord built on the note A#1
SLICE TO NEW MIDI TRACK
Right click on any Audio Clip in Ableton Live and you can select Slice to MIDI. This will chop up your beat , based on the position of the grey transient markers, then place each slice onto a pad in a Drum Rack.
Once sliced, can then play or manipulate the MIDI clip that was created or you could stop that clip and play/record these drums by hand (using a MIDI controller or your QWERTY keyboard).
A cool option in the Slice to MIDI feature is the ability to select how the audio slices will be treated in the resulting drum rack. There are
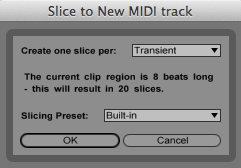
This dialog lets you select the Slicing Preset
presets to choose from – after you right click and select Slice to MIDI you will be presented with a drop-down selection of Slicing Presets – that will add audio effects to each slice, might dictate how each slice will be looped or even how each sample will respond to velocity.
Note: You can make your own Custom Slicing Presets by first customising a drum rack (drop any Simpler or Sampler device onto one drum pad, then tweak it, or add effects, make macro assignments, etc) then name it and drag it into the browser location User Library > Defaults > Slicing. If you haven’t tried this before, check it out! You will then be able to right click any audio drum loop and apply your new custom Slicing Preset.
CONVERT DRUMS TO MIDI (LIVE 9 ONLY)
Right-click on any Audio Clip in Ableton Live 9 and you can select from 3 conversion options, Convert Harmony, Convert Melody or Convert Drums to MIDI. Similar to Slice to MIDI this will create a new midi clip based on the timing of the transients in your audio clip, but with some important (and powerful differences):
- The rhythm of the kicks, snares and hi-hats are analysed independently
- The resulting MIDI clip gives a sequence for each of those 3 rhythms
- Velocity data is assigned to each MIDI note, based on the volume of each hit in the Audio Clip
- Instead of creating a Drum Rack from sliced audio you can make the clip trigger any drum kit or even select any kick, snare or hi-hat to be played by their respective pattern. The default kit provided is a Drum Rack of 606 Drum Machine samples.
Video cue: Watch this section, showing how best to prepare the loop before converting.
And we also see a slight twist on how to use this feature. Instead of manipulating the drum sounds or the MIDI rhythm, instead it is shown using the drum patterns to create musical parts. The kick and snare pattern are combined to make a bassline. This is then copied to another synth track to trigger some chords. It’s worth noting all the notes selected were random, except that all notes selected are black notes. Essentially the resulting bassline or chord progression could have been completely different, or easily changed to create useful variations.
It’s also worth noting, from a musical perspective, that the Duplicate Loop (Dupl.Loop) button is used to make this pattern seem more than what it is. At 2 bars long the original pattern could have become annoyingly repetitive. By duplicating the loop, the length becomes doubled to make this 2 bar pattern into 4 bars, and (in this example) just one note is changed in the 3rd bar – a subtle variation, but enough for the listener to “feel” this as a 4-bar phrase instead of a 2-bars long.
We also see the hi hat pattern copied to a synth track, and the settings on the Sampler instrument (available as an add-on, or included in Ableton Live Suite) adjusted so that Velocity is effecting parameters on the instrument other than Volume. This can give interesting sonic results but because it is based on the same velocity data in the hi hats and the original drum loop it still maintains a musical relationship with those parts. Note: to find velocity-responsive settings on any Ableton Instrument, look for parameters labelled “Vel.”, “Ve.” or “Velocity”. Sometimes you won’t notice much of a difference – but other times, as long as your MIDI clip contains varying velocities, it can really bring a part to life.
CORPUS (ABLETON SUITE ONLY)
Corpus is unique among all audio effect devices in Ableton Live, in that has a Sidechain function is triggered by MIDI notes, instead of the usual Sidechain process which is triggered by Audio Volumes. Corpus is a resonant filter that has an effect not unlike the Resonators device, and is actually the Filter component from the Collision instrument found in Ableton Suite. This filter resonates and this resonance can be tuned to musical values, with the (awesome) added option that this tuning can be controlled by a MIDI clip on any MIDI track in your set.
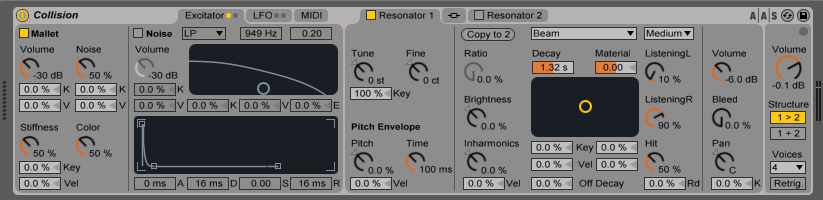
the Collision instrument in Ableton Suite models the sound of various types of material being hit or stroked. It’s the Filter section of Collision that has been made into it’s own audio effect, called Corpus.
The audio loop is played through Corpus, and that Corpus is receiving it’s tuning from the MIDI notes playing on the Chords Synth track. That is the process and the definition of MIDI Sidechaining. In this example it is worth noting that the “Chord Synth” track also contains Ableton’s MIDI effect called Chord. This is what turned the MIDI notes of the bassline pattern into MIDI chords. When Corpus receives a chord (or any other cluster of notes being played at the same time) it needs to decide which note to respond to, and in the tutorial video we see the Corpus being switched from Frequency Last to Frequency Low mode to achieve that.
Subscribe to our newsletter to keep up with our latest free tutorials, samples, video interviews and more to educate & inspire your music production.
Learn more about Producing Music with Ableton Live.