Performing live in a band is a buzz like no other…
But the last thing you want is for something to go wrong with your equipment mid-performance, or to be so busy operating your gear on-stage that you can’t even look up to interact with your bandmates and the crowd.
When Tom Marland joined Future Classic signees Panama, they were about to embark on the most important tour of their career thus-far. Soon, they would depart for SXSW (in Austin, Texas), before being due back in Australia to play a dream run of festival dates. They needed to deliver 10/10 performances, night after night.
So in preparation, Panama carefully re-evaluated their live setup, and in doing so, they managed to reduce both their on-stage complexity and their setup time. A key part of this consolidation, was replacing some of their manually operated hardware devices, with automation controlled software devices in Ableton Live.
In this, being Part 2 of a three part series on the inner-working of Panama’s live setup (read Part 1 here), Tom Marland (guitar, keys & laptop) details exactly how they came to replace some of their hardware devices, through simple but clever techniques that are relevant to anyone using (or planning to use) Ableton Live on-stage.
Hardware vs Software (on stage)
As a band, the change over between other acts and your own at gigs and festivals can be a logistical nightmare.

SXSW’s change overs are particularly infamous amongst bands and artists as on average, you are only allocated only 10 minutes for setups (getting everything set up onstage) & 10 minutes bump outs (getting everything off the stage).
We’re a three-piece band with a lot of gear on stage: four synths, one guitar, one live drum kit + trigger pads, two microphones and a bunch of FX units. So naturally, in preparation for touring SXSW (and beyond) we wanted to simplify and reduce the onstage equipment wherever possible to cut down our setup time. Through a process of trial and elimination, we managed to replace two fundamental pieces of hardware we were using in our live set with a combination of Ableton Live’s built in effects, automation and 3rd party plug-ins – which shaved significant time off our set up and reduced the complexity on-stage (lessening the chance something could go wrong).

Panama playing live at the Soundcloud Clubhouse at SXSW – one of their SXSW shows with super tight setup / changeover times
Replacing the Vocal looper
Jarrah (vocals, keys) was previously using the TC Helicon VoiceLive Touch 2 Harmoniser as a live vocal looper to create a 3-layered vocal harmony for the track “How We Feel” – you can hear the harmonised vocal part at 0:08 (and later it’s used again) below.
The the VoiceLive’s record/overdub/play/stop functions were operated manually on stage by Jarrah and were quantized in time with the BPM of Ableton’s MIDI clock. We realised however that we could utilise Ableton’s Looper effect to achieve the same effect and by doing this have eliminated the TCHelicon hardware from our on-stage setup.
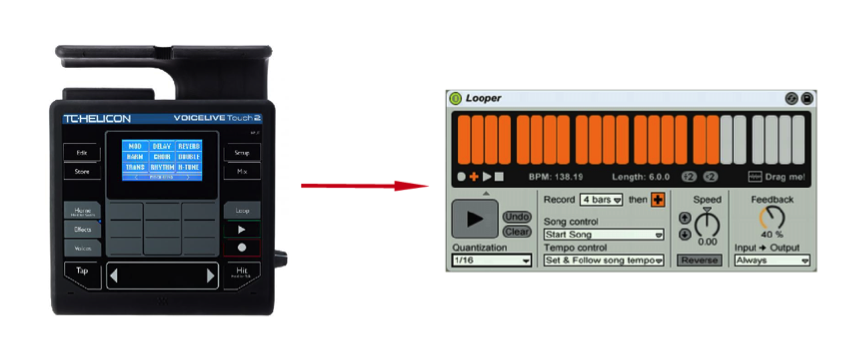
In their live show Panama have replaced the TC Helicon VoiceLive Touch 2 Harmoniser with the Ableton Live Looper effect
The way we use Ableton Live’s Looper effect on-stage now is quite simple in nature and rather than having to be manually operated like the TCHelicon hardware was, the record/overdub/play/stop functions are now all controlled by automation. The Looper effect is set on a dedicated audio track for vocal looping in our live set, which I enable (record arm) with an assigned pad in the Novation Launchpad’s “Mixer Mode” (see part 1 in this series for details on Panama’s use of the Novation Launchpad live) when it’s time to start looping , whilst the main vocal track is disabled before and during the loop (using another mapped pad on the Launchpad). The Looper effect then follows automation you can see below which controls what ‘state’ the Looper is in – record, overdub, play or stop.
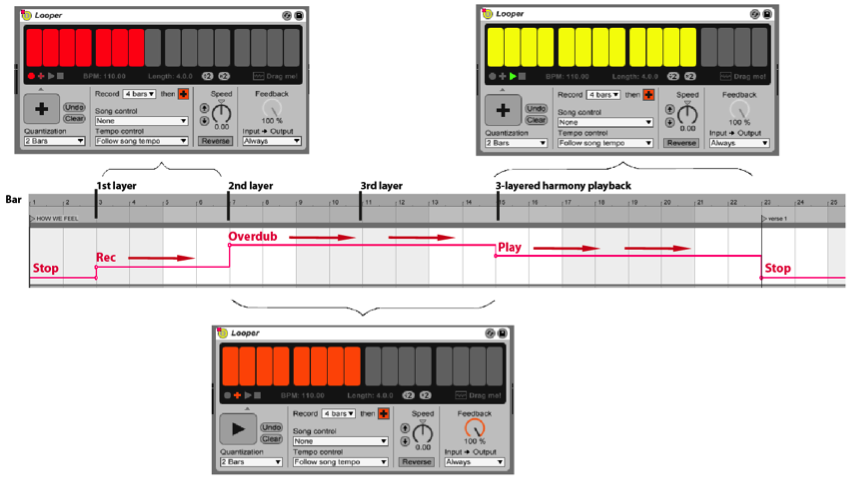
The varying states of the Looper effect as the vocal loop progresses through states of record, overdub, and play
As shown above, throughout bars 1-2 of the song the Looper effect’s state is automated to be in the “Stop” state, which sets the Looper as inactive. In bars 3-7, the Looper kicks into Rec state, which records the 1st layer of the vocals for 4 bars. From bars 7-14 automation switches the Looper effect into the Overdub state and across these 8 bars that it’s in the Overdub state, the 2nd layer of vocals are overdubbed for 4 bars from 7-10, then the 3rd layer of vocals are further overdubbed from bar 10 to 13. The 2nd and 3rd layer overdubbing also relies on having the Record mode of the Looper effect set to 4 bars, so that it overdubs itself twice within the range of 8 bars. At bar 15, the Looper’s state is switched to the Play state (via automation) and it then continues to play back the 3 vocal layers as a four bar loop until it’s automated to the Stop state at bar 23. The other key to this working is what Jarrah hears in his in-ear monitor mix, which is described in detail in part 1 of this series.
Goodbye Guitar Pedals & Amplifiers
The other piece of hardware we’ve now replaced with software was a multi-FX guitar pedal (Boss GT-8), which I had used for clean and distorted lead effects, as well as for looping live guitar. To replace the effects components I was using of the Boss GT-8, I now use Guitar Rig 5 by Native Instruments, which is an amazing amplifier and multi-effects modelling plug-in for guitar and bass.
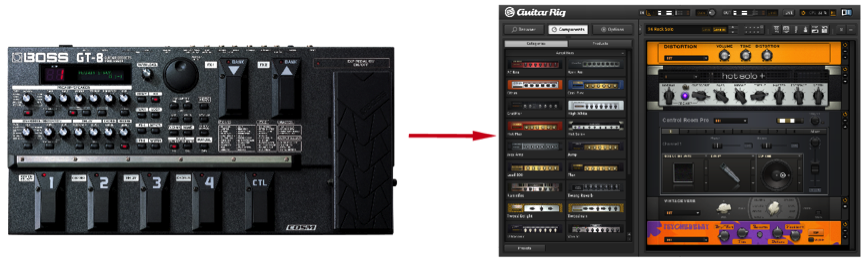
My Boss GT-8 guitar effects processor, which has now been replaced on-stage by a combination of Native Instruments’ Guitar Rig 5 and some Ableton Live effects
The tricky part of making the change to using Guitar Rig 5 on-stage was figuring out how to substitute the GT-8’s foot pedals, which I was using to control switching between effects. To overcome this, I’ve used track automation to execute such functions.
Several customised instances of Guitar Rig 5 (each one set up for a different guitar sound I need) are set up on a dedicated audio track in Live which is record armed and receives audio direct from my guitar (via a recording interface). These multiple Guitar Rig 5 devices are then switched “On” and “Off” using Device On automation which changes between the devices (and therefore changes between my required guitar sounds) as each track progresses.
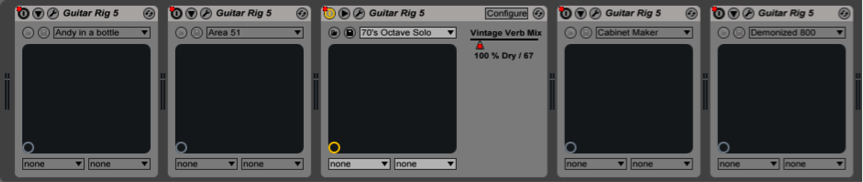
Thomas uses multiple instances of Guitar Rig on a single audio track, which are automated between On and Off – automatically switching between his different guitar sounds
If the guitar is not being used in a given track, the Track Activator for the guitar channel is automated to an “Off” state so that it is completely muted whilst I play other instruments.
I also use the Ableton Live Utility audio effect, on which the Gain is automated to replicate volume swells from a volume pedal as you can see in the following picture.

The Gain parameter of Ableton Live’s Utility audio effect is automated to emulate volume swells from a foot controlled volume guitar pedal
Similar to how Jarrah’s vocal looping now works, in the track “Destroyer” I’ve also automated Live’s Looper device to loop 8 bars of the palm muted clean guitar riff that kicks in at 0:33, so that I can then play lead guitar and synths whilst clean guitar riff loops throughout the rest of the track.
In a way, for me this new set up is like having an virtual guitar tech back of house (side of stage) who knows our songs inside out and switches between my required guitar FX accordingly, allowing me to focus wholly on performing and interacting with the other band members.
To Ableton, my trusty guitar tech – thank you.
Check out Part 1 of this series from Tom Marland on Panama’s live setup, in which Tom explains their in-ear monitoring, submixes and audio interface setup. Tune in for the 3rd and final part: Controlling External Instruments.
Subscribe to our newsletter to keep up with our latest free tutorials, samples, video interviews and more.
Learn more about Producing Music with Ableton Live.
