This post covers two massive time-saving workflows in Ableton Live: “copy value to siblings” and “copy macro to siblings“. The first is built into Live already so you can start using it straight away, and the second is something of a hack and not part of the default features – so I’ll show you how to activate it.
Both these features come into play when you’re using a Rack that contains multiple chains of identical devices. For example, a Drum Rack is a rack of 128 chains, each containing a sample loaded into a Simpler device. If you’ve ever wanted copy a setting from one drum sound to all the others, these two tricks will do it a single mouse click and could save you hundreds.
Let’s look at some example workflows.
Copy Value to Siblings
This will work on any type of Rack, but first let’s use the example of a Drum Rack device containing multiple drum samples.
Imagine you’re playing a beat on a velocity-sensitive controller or drum pad such as Ableton Push, and you feel the velocities are just too hard to control – the volumes of the hits are varying too wildly for a tight performance – so you need to lower the velocity response of all the Simplers in the drum rack.
To do this, you could select each pad, go into the chain and find the Simpler velocity > volume control for each sample… but there are 128 pads & chains in a drum rack!
Instead, find the velocity > volume parameter of just one pad, turn it down, then right click and select Copy Value to Siblings. Done!
Try it out:
1. Load in Ableton’s Kit-Core 808.adg Drum Rack – you’ll find this in the Drum category of Live’s Browser.
2. Click on any pad, then adjust the Velocity > Volume parameter. For the sake of the exercise, set it to 0% (by default it will be on 35%). Here’s a screenshot to show you where that parameter is:

3. Right click the Velocity > Volume parameter and select Copy Value to Siblings. Now all of the other Simplers in your drum rack will also have 0% on their Velocity > Volume parameter.

Copy Macro to Siblings
Let’s kick that same technique up a notch. Sure it’s great to be able to adjust parameters across all sibling devices, but assigning them all to the same Macro dial could be even more useful!
For example, a workflow I use often is applying the Slice to MIDI function to a vocal acapella. This creates a Drum Rack full of one-shot vocal slices that I can then sequence rhythmically with MIDI. You can hear this technique in action here on the remix I did for Bag Raiders – I sliced an entire acapella into 8th notes using Slice to MIDI then hand-played the samples until I found a combination that worked with the track:
When I find an acapella that works particularly well, I’ll save it away as an Drum Rack preset and use it on other songs in the future.
If the tuning of this sliced acapella Drum Rack doesn’t fit the song then there’s a lot of clicking and fiddling (even with the Copy Value to Siblings function I’d have to tune one sample, right-click, copy to siblings, listen, then repeat until correct). The “Copy Macro to Sibling” trick has totally streamlined this workflow for me – I assign the tuning of one sample to a Macro then assign all siblings to the same macro. That macro becomes a global transpose control for every vocal sample in my rack so I can just listen and tune all the slices easily in real-time.
Accessing this feature
Almost like hacking the program. but in a safe and user-friendly way, you can reconfigure settings hidden from view from most users, via a little-known set of optional features known as Options.txt
An explanation from the Ableton website: With the “Options.txt” file we offer a way to change some of Live’s options for special circumstances. These options are mainly used for developing and internal testing. However, some of you may find them useful as well.
Step 1: Find the options.txt file.
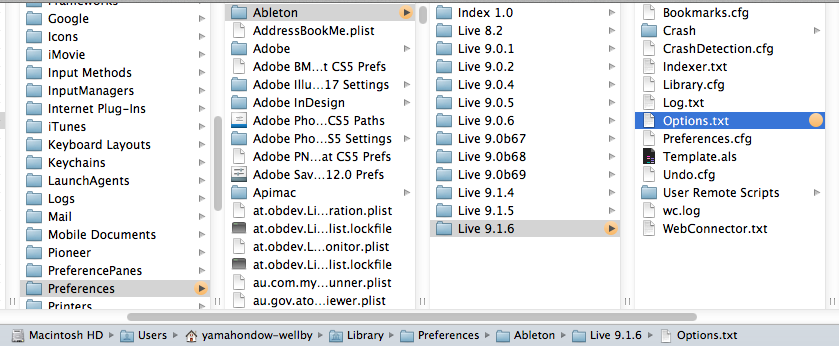
It’s located at Library > Preferences > Ableton > Live 9.1.6 (this number will be whatever version you’re on) > Options.txt
Here’s a screenshot showing the file path of my Options.txt file:

Step 2: Open the Options.txt file in TextEdit and paste this text in:
-EnableMapToSiblings=1
Step 3. Then save the Options.txt file and restart Ableton Live to activate the feature.
To test it out, use the same Drum Rack you were using in the earlier Copy Value to Siblings exercise
- Right click the velocity of any Simpler and select Map to Macro 1
- Right click the velocity again and select Map to All Siblings
- Done!
Again, this will work on any type or Rack, not only Drum Racks – and now that you have updated the Options.txt file the option will be available in every session from now on, you won’t need do this every time.
I hope you found this useful – happy music-making!
For more time saving Ableton Live workflows, check out this article by Thom McAlister (ALBA) which goes through how to set up default tracks, live sets and devices in Ableton Live.
Subscribe to our newsletter to keep up with our latest free tutorials, samples, video interviews and more. Learn more about Producing Music with Ableton Live.


