We’re continuing on with our Tips + Tricks series and this month we’ve brought in one of our own. Josh Panakera-Molony is one of our expert trainers here at Liveschool so we’re very excited to present you with his tips for using Max for Live’s LFOs to add that much desired human feel to your hi-hats. Adding a dash of swing or shuffle from the groove pool is a quick and easy method to spice up a straight MIDI drum pattern within Ableton. In this tutorial, Josh shares some tips to take us even further towards programming a natural sounding groove:
Max for Live Essentials
For this demonstration, Josh is using two devices from the Max for Live essentials pack, included in the Ableton Live 9 Suite, or available for free download for Max for Live users via ableton.com
Drum Synth
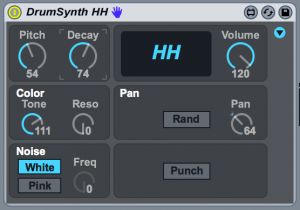
The Max for Live DrumSynths are a series of extremely useful drum machine devices that are great for crafting your own unique percussion sounds. The simple interface of the Max for Live DrumSynth hi-hat allows us to alter a few parameters that can change the sound and create a more nuanced character to each drum hit. This tutorial will use two:
Decay dial
The decay knob will change the length of the hi-hat note.
Tone dial
The tone parameter acts as a filter for the hi-hat sound, cutting out more of the low end of the sound as the value is increased.
Max for Live LFO
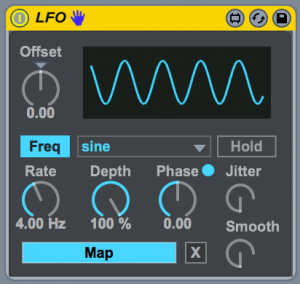
The Max for Live Low Frequency Oscillator (LFO) has a wide range of applications, primarily to modulate parameters within other Ableton devices. For this application there are two key parameters being used to achieve the ‘human’ feel:

Offset dial
This dial ‘offsets’ the minimum and maximum values of the LFO, which is useful to select where the range
Jitter dial
The Jitter knob will introduce small inconsistencies to the LFO waveform. This is extremely important for this example to create small, unpredictable changes to our output values.
Mapping LFOs to DrumSynth Parameters
Starting with a pattern of straight 16th notes, Josh maps a series of Max for Live LFOs to his DrumSynth hi-hat to mimic several performance techniques that alter a drummer’s hi-hat strikes.
Hi hat Pedal pressure
A first LFO is mapped to the hi-hat decay. This creates small variations to the length of each note. The offset and jitter parameters of this LFO are adjusted to taste to allow a natural sounding variation to the note lengths to mimic the opening and closing of the hat. A second LFO is daisy-chained to the first to then modulate the offset of the first LFO, creating an extra layer of randomisation to the sound.
Tone
Another LFO is mapped to the Tone parameter of the DrumSynth, with Jitter and Offset again adjusted to taste. Modulating the tone of the DrumSynth in this way creates small changes to the sound of the hat reminiscent of how a player’s strike changes the sound as it moves from the rim of the hat to the bell.
LFO modulating Shuffle and Swing
The crucial component of creating a natural sounding drum part comes from imitating a player’s natural feeling. By mapping an LFO to the Global Groove, and again using Jitter and Offset to tweak the end result, we can push and pull the shuffle and groove to create variation reminiscent of a drummer’s performance.
Further Tips + Tricks
In case you missed it, November and December saw local producers Swindail and Doug Wright from Fishing step up with their tips for using track delays and replicating MPC track mutes.
—–
If you’re interested in learning more techniques like this to help take your tracks to the next level, check out our Produce Music course.